Showing posts with label arts and crafts. Show all posts

Wednesday, March 11, 2009

A Rainbow of Colors

Is it just me, or is everyone posting about rainbows lately?? Maybe it's a March or St. Patty's Day thing to do? Well I decided jump on the bandwagon... kind-of. Today the girls and I talked about primary colors and the color wheel, and then made our own.

Paper Plate Rainbow...
We started by painting a rainbow to get us in the mood. Cut a paper plate in half, paint with correct colors (in order).


Primary Color Circles
I took a large sheet of paper and a bowl and traced 3 circles at the top. The girls painted the circles the primary colors.

I then traced overlapping circles and the girls painted the primary colors and then the color that those two colors make.


Age-Appropriate Color Wheel...

Finally I traced a pizza pan and then divided it into sixths. We painted the primary colors first, so it was easy to figure out where the other colors fit in.


Educational Art... Love it!

Monday, March 2, 2009

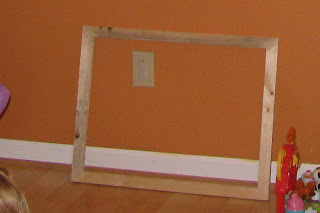
Cute (home-designed) Frame

I am having a lot of fun adding simple accents to things around the house to really make it personal. We are going to Cancun in May, and I wanted a fun, "summery" frame to put a picture of the kids in, but let's face it, I didn't want to spend a fortune!

So I bought a simple wood frame from Michael's, and 2 ready-to-go knick-knack things (I don't know what the official name is). I paid less than $5 for everything.
I painted the frame white (removed the glass, left the paper in attempt for less mess), let dry, and glued the knick-knacky things on.

Simple, cute, and inexpensive!

Simple Message Board

Here is a fun and simple way to *spice-up* a message board!

We started by tearing small-ish pieces of tissue paper (perfect for little fingers to do!). I then painted Mod Podge all over an old picture mat I wasn't using, and the girls covered the mat with the tissue paper pieces. When they were satisfied with their work, I then covered the entire mat with another coat of Mod Podge. Let dry for about 45 minutes, then turn over and Mod Podge the pieces to the back that are hanging over (don't worry, you won't see the back).

I found a magnetic white board on clearance at Target for $4.68, and it just happened to be the right size (11"x14"). Score!

Next step was to remove the pen holder at the top of the white board (it was in the way of our frame) and then hang the white board to the back door where we will see it everytime we go somewhere. I used the double-sided foam sticky tape that came with the board. I also had some dry erase markers that were attached to magnets from another random shopping trip.
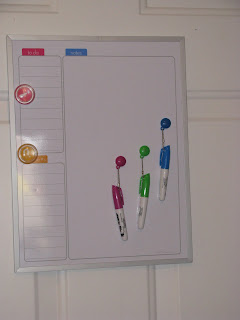
Attach several pieces of double-sided foam sticky tape around the edges of the white board...
Stick your fancy border to the board, write a little note, and....


Ta-Da!


A sweet little message board to write special notes.

(My girls were *oh*so*excited* to write a note to Daddy as soon as the board was finished!)

Thursday, February 5, 2009

Tic Tac Toe Hearts

Directions here.


Special thanks to Marie

Monday, February 2, 2009

Art Gallery


My girls absolutely love to do art projects. They don't need anything fancy, sometimes just coloring or drawing keeps them happy. But they literally make about 5 "pieces of art" a day, some really cute, others kind of sloppy. I have a husband who adamently refuses to let me clutter the fridge or kitchen cabinets with the girls' "artwork", and after filling the stairway to the basement, I finally decided to make an Art Gallery for them to display their finest art to date. I love how the wall turned out... so much that I'm thinking of not only adding more frames to that wall, but finding more walls to turn into Art Galleries!

I started with ever-so-sweetly convincing Scott to build 4 frames. He used some cheap wood from Lowe's, cut to size, and drilled together.

The next step was for me to spray paint the frames black (note: spray paint goes everywhere and gets on everything and is best not to do in a finished basement, regardless of how cold it is outside!) .

I hung the frames where I wanted them on the walls, then lightly traced inside the frames with a pencil, taped just outside the lines, then painted the insides white (2 coats was all it took. Oh, and I used a small foam roller to keep it as smooth as possible).


Hang the frames again, and you have an art gallery just waiting to be filled! (for now I'm using blue painters tape to hang the artwork. I was going to do clips, but didn't want to be stuck with only being able to hang the pieces a certain way. That may change in the future, or if you have any ideas, please share!)


Introducing... Our Art Gallery!

Woven Hearts: 6 Ways


I can remember doing these when I was little! I'm so glad I found the template on maya*made, I was nervous I'd have to figure it out on my own, ha.


Instructions here.

Friday, January 30, 2009

Heart Mobile


1. Paint a large piece of this paper, covering the entire piece (I used the back of office calendars my husband brought home from work).


2. To add a little dimension and flair, when the paint had dried for about 20 minutes, we dipped heart-shaped cookie cutters in white paint and stamped.


3. I let the paper dry overnight, then traced 2 different sized hearts on the back, and then my 4 year-old cut them out (my 3 year-old isn't that "smooth" with her cutting yet). It really doesn't matter how many hearts you cut, as long as you have an even number of each size. Cut a piece of string or yarn to desired length.


4. Lay out the yarn and position half of the hearts, face-down. Tape each heart to the yarn like shown below.


5. Glue the leftover hearts to their counterparts.


6. I put heavy books over the hearts while they dried (overnight) to make sure they were flat. Hang up and enjoy!


Tuesday, January 27, 2009

watercolor initials (or anything else!)


I'm digging these from Blissful Kids. Directions

Monday, January 26, 2009

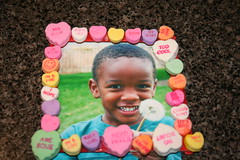
Valentine Conversation Heart Frame


This was quick and fun yesterday! We painted popsicle sticks red, which I don't know if I would do again, since you can't see much of the red anyway. After the paint was dry, I had the boys glue on large and small conversation hearts. Joshua, my 2 year old, ate way more than he glued on (ew). To finish the project, grab a picture - I think close ups of faces work best - and glue it to the back. The finished size of the inside of the frame is close to 4" square, so keep that in mind when printing your pictures out. We're going to send ours to the Grandmas.

Crayon Hearts


*
Materials:
crayon pieces
heart-shaped muffin pan
double-sided foam mounting tape
colored cardstock
scissors
markers
*
Directions:
Heat oven to 250
Fill each mold with crayon pieces and bake until melted (10-15 minutes)
Once cooled, remove from molds.
Using foam tape, attach "love notes" to the hearts, much like picture above.
*

Sunday, January 25, 2009

Chinese New Year Pendant


My kids are a bit too young to cut these out well, so we'll skip this project this year, but maybe your kids are a bit more adept with scissors in small places.

The link and all the templates are here.

Thursday, January 15, 2009

Homemade Musical Instruments


Stuck inside with an insane cold snap? Throw together a preschool family-room band. Lots of ideas for homemade instruments here.

Tuesday, January 13, 2009

Coloring Circles

Take a piece of paper (we used the big floor paper) and draw circles of all different sizes with a black sharpie, some overlapping, some inside one another, some just out on their own. Then color each portion of the circle it's own color, making sure not to let the same color touch.

This is a perfect winter afternoon activity because everyone can lay on the floor and color together and everyone gets to be creative... the more colors used the better! It also takes awhile to complete and can be put away and finished later without much effort.

The other reason I really liked this activity is it really helped enforce the concept of "coloring within the lines" (what a concept, huh?!).

Monday, January 12, 2009

Snow Painting

This is a cheap and easy time killer if you're LUCKY enough to live where the snow never melts. (ok, it's not that bad here - we haven't seen the grass in a month, but it could always be worse!)
I mixed up some colored water - just food coloring with the instruction to PLEASE not get their clothes dirty - in condiment and squirt bottles.


Then I send the kiddos outside and let them loose. Ok, ok - I played, too.


The kids liked the water in condiment bottles better, but I preferred them to have the squirt bottles. The water came out too fast in the condiment bottles for my liking - wasn't as easy for them to have control, especially when Jacob was trying to write his name, and also - they ran out much quicker, which meant more trips for me inside to refill.

Thursday, January 8, 2009

Easy Valentine's Wreath

My head is already all about VALENTINE'S. If I could finally get healthy I have some fun ideas. Until then, here's a cute wreath tutorial to do with the kiddos. Use tissue paper for a less expensive, but not outdoor friendly option.

All the directions here on Little Birdie Secrets.

Monday, December 22, 2008

Button Wreath Ornament

Oh my ever-loving cuteness!


leave it to Martha!

Sunday, December 21, 2008

tissue paper christmas tree

Do you need a last minute art project or card? (you could also use construction paper strips)
Source: Art Projects for Kids

winter bird feeders

I thought for a minute about giving the birds outside the burned popcorn from yesterdays garland before I decided against it. Then I saw all these this morning.

My favorite to make have always been the peanut butter on pine cones rolled in birdseed
but maybe we'll try something different this year.

Click on photo to get to original source/directions.

Saturday, December 20, 2008

popcorn garland

*Prints for Rudolph

foot*print for head
hand*prints for antlers
finger*prints for eyes
thumb*print for nose