Wednesday, March 18, 2009

Moving...

We are in the process of moving Glitter Mommies over to Wordpress. Our new name and url will be...

Seven Little Monkeys

Bear with us during the move. Hopefully it won't take too long!

Wednesday, March 11, 2009

A Rainbow of Colors

Is it just me, or is everyone posting about rainbows lately?? Maybe it's a March or St. Patty's Day thing to do? Well I decided jump on the bandwagon... kind-of. Today the girls and I talked about primary colors and the color wheel, and then made our own.

Paper Plate Rainbow...
We started by painting a rainbow to get us in the mood. Cut a paper plate in half, paint with correct colors (in order).


Primary Color Circles
I took a large sheet of paper and a bowl and traced 3 circles at the top. The girls painted the circles the primary colors.

I then traced overlapping circles and the girls painted the primary colors and then the color that those two colors make.


Age-Appropriate Color Wheel...

Finally I traced a pizza pan and then divided it into sixths. We painted the primary colors first, so it was easy to figure out where the other colors fit in.


Educational Art... Love it!

Monday, March 2, 2009

Cute (home-designed) Frame

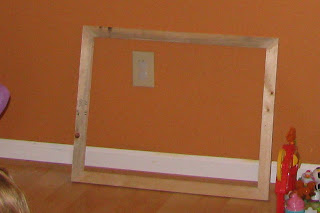
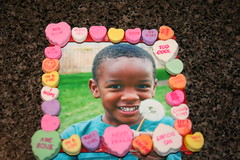
I am having a lot of fun adding simple accents to things around the house to really make it personal. We are going to Cancun in May, and I wanted a fun, "summery" frame to put a picture of the kids in, but let's face it, I didn't want to spend a fortune!

So I bought a simple wood frame from Michael's, and 2 ready-to-go knick-knack things (I don't know what the official name is). I paid less than $5 for everything.
I painted the frame white (removed the glass, left the paper in attempt for less mess), let dry, and glued the knick-knacky things on.

Simple, cute, and inexpensive!

Simple Message Board

Here is a fun and simple way to *spice-up* a message board!

We started by tearing small-ish pieces of tissue paper (perfect for little fingers to do!). I then painted Mod Podge all over an old picture mat I wasn't using, and the girls covered the mat with the tissue paper pieces. When they were satisfied with their work, I then covered the entire mat with another coat of Mod Podge. Let dry for about 45 minutes, then turn over and Mod Podge the pieces to the back that are hanging over (don't worry, you won't see the back).

I found a magnetic white board on clearance at Target for $4.68, and it just happened to be the right size (11"x14"). Score!

Next step was to remove the pen holder at the top of the white board (it was in the way of our frame) and then hang the white board to the back door where we will see it everytime we go somewhere. I used the double-sided foam sticky tape that came with the board. I also had some dry erase markers that were attached to magnets from another random shopping trip.

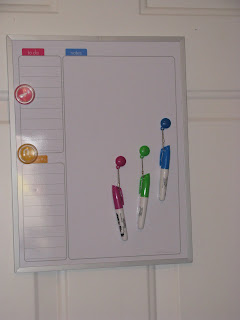
Attach several pieces of double-sided foam sticky tape around the edges of the white board...
Stick your fancy border to the board, write a little note, and....


Ta-Da!


A sweet little message board to write special notes.

(My girls were *oh*so*excited* to write a note to Daddy as soon as the board was finished!)

Sunday, March 1, 2009

Kid-Friendly Salads

Family Fun has posted some incredible salads to try this Spring & Summer. It makes me even more excited for fresh fruits and veggies! Here are a few of our favorites... {Click on the picture for the recipe}

*
*

Tuesday, February 17, 2009

Organizing Cubes


I've had these wonderful shelving units with cubes/bins for over a year now. They are perfect for stashing anything and everything into. However, the kids never had any idea what was in them, so they would...
.
(a) go ignored (meaning toys were not played with) or
(b) get dumped out to see what was inside (meaning a nice big mess for me to clean up) or
(c) my lovely "helpful" husband would shove anything on the floor into any bin looked good that day (meaning yet another unorganized hidden mess).
.
A couple months ago I had the idea to take pictures of the inner contents. Great idea, right? Sure, but I couldn't come up with a way to attach the pictures with anything but packaging tape (too tacky, I wanted cute!). A couple nights ago it hit me: contact paper and ribbon! I put contact paper on both sides of the pictures, hole-punched, and tied ribbon to the handles of the cubes. It's cute, it's organized, and (everyone cross your fingers with me here) will help my kids play with and put away their toys!


Saturday, February 14, 2009

President's Day, by Anne Rockwell


We really enjoyed this book.

ABC Pretzels


Maybe I'm new, but I just found these at Meijer a couple days ago... ABC Pretzels. They are nothing short of fabulous. My kids love spelling names and words, looking for letters, playing "I Spy", etc. The novelty of the pretzel is back!

Last Minute V-Day Ideas

Jell-O with (frozen) raspberries in heart cups
(found these at JoAnn's - $6/12 cups)

Homemade pink mint ice-cream
(using same heart cups)

Heart Cake!
(1 cake mix, 9" square pan, 9" circle pan, conversation hearts)

Friday, February 13, 2009

Valentine's Strawberry Brownie

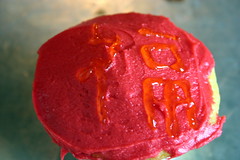
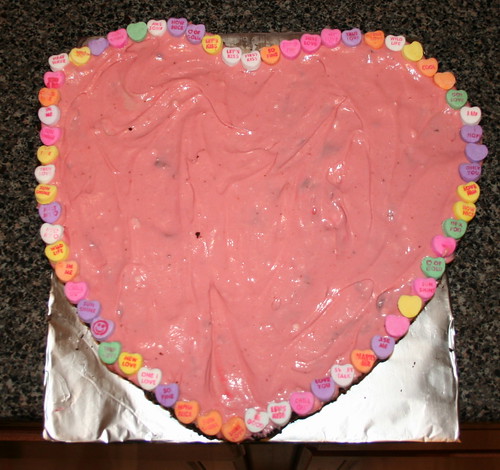
This is what Jacob's preschool teacher is getting for Valentine's - an extra large heart shaped brownie, topped with pink frosting (8 oz cream cheese mixed with 1/2 cup jam and 1/2 cup pwd sugar) and decorated with candy hearts. I saw giant heart pans like this for $5.99 at Target this week - good for birthdays and "thinking of you" gifts, too.

Wednesday, February 11, 2009

Valentine's Breakfast

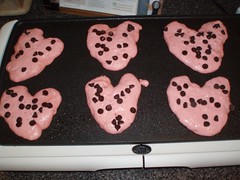
This is a picture from our breakfast on Valentine's two years ago - pancake mix with red food coloring thrown in and chocolate chips on top. I think I'm going for a repeat this year, with PINK MILK on the side.

Thursday, February 5, 2009

Tic Tac Toe Hearts

Directions here.


Special thanks to Marie

Monday, February 2, 2009

Candy Bar Tarts

Oh my yummy goodness!
Directions here.


whose shoes?

Just a tip to help with the smooth running of your household...

My kids are all 17 months apart, and they are to the age where the difference in their sizes is shrinking, especially with shoes. So I adopted a little organizational strategy to help keep all of us sane: the dot strategy. Kylie is 1 dot, Stella is 2 dots, and Chasen is 3 dots (yes, birth order).

Let me demonstrate my favorite example...
This is what we see when it's time to put the kids' boots on. Kind-of hard to figure out whose is whose, right?

So on the bottom of the boots I put their personal dots...

Now, when it's time for the kids to put on their boots, they have no problems finding their own pair. Even Chasen (23 months) can find his own! And when Kylie outgrows her pair, I'll just add a dot, and poof! -Stella has a new pair of boots.

This works really well with practically anything that will get passed down through the kids, and let me tell you it makes sorting laundry a lot easier when I need help (like from the husband or grandparents) since the size doesn't always tell you who the shirt might belong to!

Art Gallery


My girls absolutely love to do art projects. They don't need anything fancy, sometimes just coloring or drawing keeps them happy. But they literally make about 5 "pieces of art" a day, some really cute, others kind of sloppy. I have a husband who adamently refuses to let me clutter the fridge or kitchen cabinets with the girls' "artwork", and after filling the stairway to the basement, I finally decided to make an Art Gallery for them to display their finest art to date. I love how the wall turned out... so much that I'm thinking of not only adding more frames to that wall, but finding more walls to turn into Art Galleries!

I started with ever-so-sweetly convincing Scott to build 4 frames. He used some cheap wood from Lowe's, cut to size, and drilled together.

The next step was for me to spray paint the frames black (note: spray paint goes everywhere and gets on everything and is best not to do in a finished basement, regardless of how cold it is outside!) .

I hung the frames where I wanted them on the walls, then lightly traced inside the frames with a pencil, taped just outside the lines, then painted the insides white (2 coats was all it took. Oh, and I used a small foam roller to keep it as smooth as possible).


Hang the frames again, and you have an art gallery just waiting to be filled! (for now I'm using blue painters tape to hang the artwork. I was going to do clips, but didn't want to be stuck with only being able to hang the pieces a certain way. That may change in the future, or if you have any ideas, please share!)


Introducing... Our Art Gallery!

Woven Hearts: 6 Ways


I can remember doing these when I was little! I'm so glad I found the template on maya*made, I was nervous I'd have to figure it out on my own, ha.


Instructions here.

Friday, January 30, 2009

Favorite Cereal

This is *oh so very* Sid the Science Kid...


This morning I put 3 different cereals in dixie cups for the kids, and we recorded which cereals they liked, without milk and then with milk. We charted the results and then talked about the findings. It was fun to see them get so excited about which cereal they liked or didn't like, and why!

Heart Mobile


1. Paint a large piece of this paper, covering the entire piece (I used the back of office calendars my husband brought home from work).


2. To add a little dimension and flair, when the paint had dried for about 20 minutes, we dipped heart-shaped cookie cutters in white paint and stamped.


3. I let the paper dry overnight, then traced 2 different sized hearts on the back, and then my 4 year-old cut them out (my 3 year-old isn't that "smooth" with her cutting yet). It really doesn't matter how many hearts you cut, as long as you have an even number of each size. Cut a piece of string or yarn to desired length.


4. Lay out the yarn and position half of the hearts, face-down. Tape each heart to the yarn like shown below.


5. Glue the leftover hearts to their counterparts.


6. I put heavy books over the hearts while they dried (overnight) to make sure they were flat. Hang up and enjoy!


Tuesday, January 27, 2009

car ramp


Tomorrow we're getting new window treatments, so I had to remove the old wood valance above our living room blinds. I had no idea what to do with it, but knew I didn't want to throw it away. I can't stand to throw stuff away when it could come in handy someday. I set it up on the couch and Chasen immediately started driving cars down it. Perfect! Chasen played all morning with his cars and the new ramp. I have to admit that this is especially exciting for us because up until now Chasen could care less about cars. All he ever wants to play with are balls: footballs, tennis balls, superballs, basketballs, soccer balls etc. Today is a good day; we've turned over a new leaf!

I just love it when our
junk turns to treasures!

watercolor initials (or anything else!)


I'm digging these from Blissful Kids. Directions

Monday, January 26, 2009

Valentine Conversation Heart Frame


This was quick and fun yesterday! We painted popsicle sticks red, which I don't know if I would do again, since you can't see much of the red anyway. After the paint was dry, I had the boys glue on large and small conversation hearts. Joshua, my 2 year old, ate way more than he glued on (ew). To finish the project, grab a picture - I think close ups of faces work best - and glue it to the back. The finished size of the inside of the frame is close to 4" square, so keep that in mind when printing your pictures out. We're going to send ours to the Grandmas.

Chinese New Year Cupcakes


I know, it's not a cake wreck, but close, huh? Here was my attempt at a Chinese New Year cupcake. We used yellow cake mix with extra yellow food coloring to get a really nice "gold" cake, and then I went to town with the red food coloring to get a nice red buttercream. I forgot, however, to save some white buttercream to tint bright yellow to write with. Instead, I used yellow piping gel, which didn't show up well at all.

Hint: If you're not using Wilton (or other "real") cake decorating color, get the gel food coloring at any grocery store. They make much more vibrant colors than the normal, liquid dropper food coloring (that I'll never buy again after discovering the gel stuff!)

Directions for Chinese Good Luck character here